


How to Deploy NSX Manager
- Feb 24, 2023
- 2 min read
I recently redid my home environment. This post is to go over how I setup NSX Managers. As I have vSphere 8, at the time of the deployment, NSX Version is the only 1 supported. Check the VMware Interoperability matrix for compatibility.

Prep Work/Requirements
VLANS - 3 - Create 3 physical vlans and present them to your VMHosts
vSphere Distributed Switch - Make sure this is version 7 or 8 (what ever version your ESXi/vcsa version are)
IP Pools - 2
Edges - 2
Download the NSX Manager OVA
Step 1
Read the Quick Start Guide
https://docs.vmware.com/en/VMware-NSX/4.0/quick_start/GUID-1669F047-97DC-46A9-BD42-61C1ED8EF2C0.html
Step 2
Open vSphere and Login > NSX > Click on Install NSX

Step 3
Specify Local File > Upload Files > Select NSX Manager with vCenter Plugin OVA (nsx-embedded-unified-appliance-4.0.1.1.0.20598732.ova) > Click Next

Step 4
Name the Virtual Machine. I used NSX-mgr-1, Select your Folder, and click Next

Step 5
Select the cluster, Validate Compatibility, and Click on Next

Step 6
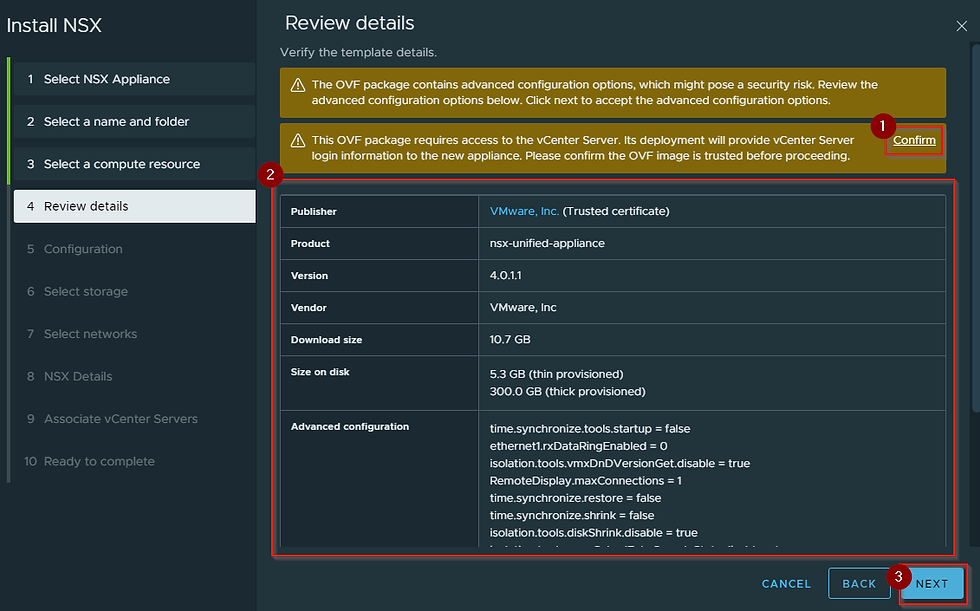
Confirm OVF Package requires access to the vCenter Server, Validate the Info, and Click Next
Step 7
Select the NSX Manager Size ( I choose Small for my home lab), and Click Next

Step 8
Select the Storage Format, then Select the Storage Location to deploy the manager to, then Click Next

Step 9
Select the Network for the NSX Manager to live on, the IP Protocol, and then Click Next

Step 10
Type in all the details for your NSX Manager, Validate you typed everything correctly, then Click on Next. Make sure your Root User Password is ultra-complex, as the password could fail to be set correctly if you do not do an ultra-complex password. I ran into this issue on my first run.


Step 11
Select the vCenter Server to associate the NSX Manager with, and Click Next

Step 12
Validate all the configuration info, and Click Finish


Wait for the OVA to deploy and automatically Power on. The manager will then register with your vCenter Servers.

Post Deployment
Step 1
Login to the https web interface of your new NSX Manager node via IP https://10.0.2.11. This will not have a trusted certificate on the manager, so you will be required to accept the risk and continue.

Step 2
Login with the admin user account and password

Step 3
Accept the End User License Agreement

Step 4
Join the Customer Experience Improvement Program

Step 5
Click On System > Appliances > Add NSX Appliance

Step 6
Enter VM Info including-
FQDN:
Management IPv4 CIDR:
Management Gateway IPv4:
Validate DNS/NTP/Search Domains, and Node size are correct, then Click on Next

Step 7
Validate Computer Manager, Compute Cluster, Resource Pool, Host, Datastore, Virtual Disk Format, Select the Network, then click Next. It is a good recommendation to put NSX Managers on different Datastores to protect from a single point of failure.

Step 8
Set SSH on/off, Enable Root access on/off, type in your root password, and Click Install Appliance

Step 9
Wait until NSX Manager node deployment is completed and available, then repeat steps 5-9 to deploy the third node of the NSX Manager Cluster. This process can take 20-30 minutes depending upon storage, network, etc.


Step 10
Click on Set Virtual IP, Input the Cluster Virtual IP, and Click Save


Comments