


Setup a Synology NAS with 10Gb Network Configuration for iSCSI
- Feb 16, 2023
- 5 min read
Today I setup on Synology DS1621+ NAS on my 10Gb Ethernet Network. This did require a bit of up front planning. I had to have a dual 10Gb card for the NAS, SFP+ cables, and a power drop for the NAS on my rack.
To help simplify my setup, I will setup 2 new VLANs for the NAS
I use Unifi network gear at my house. It works really good for my semi-enterprise lab.
Setup the the VLANs on my Unifi gear:
I logged into my Dream Machine Pro User interface with admin rights (via https://unifi.ui.com/dashboard)
I opened the Network App
I browsed to the Settings > Networks area
I created 2 new VLANs. This is especially important so that you have multiple connections from each VMware Host to your iSCSI/NFS Storage. Separating the storage network traffic via VLANs prevents network collisions. This is also called multipathing.


Create the Distributed Switch Port Groups:
I will add the VLANs to the distributed switch for use with VMkernel adapters that will be created on the VMHosts
Login into your VCSA
Go to Inventory > Network
Select the Distributed Switch
Click on Actions > Distributed Switch Port Group > New Distributed Port Group
Set the Name of your Port Group. Mine is (17) iSCSI-HAMNAS04 (I like to put the VLAN in parentheses in the name of the port group to make it easy to understand the VLAN/IP Segment), and click Next
Change the VLAN Type to VLAN, Modify the VLAN ID to your VLAN, and click Next
Review the settings and click Finish
Review the new Port Group
Repeat Steps 4-8 for the 2nd VLAN.


Setup your Synology on Dedicated VLANs
I moved my Synology NAS off my desk and over to my rack, connected the power, and then connected the 10Gb ethernet connections via Twinax.
Steps I used to set static IPs for use with iSCSI/NFS
Power on Synology NAS
Use the find my NAS site to find the NAS on the new VLAN (I setup DHCP temporarily on this VLAN to make this easy, you can turn DHCP off on the VLANs post static IP assignment). http://find.synology.com/
Log into the Synology NAS
Click on Control Panel > Network > Network Interface
Edit the connection you wish to setup
Input the IP Address, Subnet mask, Gateway, DNS, MTU (9000 should always be set if you are doing iSCSI/NFS), and optionally a VLAN
Click OK
Repeat steps 5-7 for the other 10Gb Ethernet interface


Create Synology iSCSI Target and LUN
You will want to create your first iSCSI Target and LUN prior to setting up the VMHosts. This will allow you see the first LUN post VMHost configuration.
Login to Synology NAS
Click on SAN Manager > ISCSI > Add
Click on Next (modify the Target Name if you wish)
Select a new LUN > Click Next
Type in the LUN Name, Select the Volume, Type in the Total Capacity (GB), Select if you want Thick or Thin provisioning (I always recommend Thin), and click on Next
Confirm the configuration settings and click on Done
Validate that the iSCSI Target is now Ready and Healthy
Click on Edit > Advanced > Check the Allow multiple sessions box, and click on Save. This is very important so that all VMHosts in a cluster can see the same datastore.


Create the VMHost iSCSI Static Discovery/VMkernel Adapters
I will then create VMKernel adapters on each host to communicate on that network. Since I use Host Profiles, I will create the adapters on the Host Profile and then simply go add the IPs for each VMHost in the Host Profiles Customizations and then will simply remediate the hosts to have the configurations standardized for all VMHosts.
Modify your Host Profile:
Login into your VCSA
Click on the 3 bars in the left hand top corner > Policies and Profiles
Click on Host Profiles
Right Click on the Host Profile you are using > Click on Edit Host Profile
Open the Synology Web interface and copy the iSCSI IQN for future use
In the Host Profile, expand the iSCSI Initiator Config > Expand Software iSCSI > Expand vmhba64 > Expand Static Discovery > Click on the +
Type in the IP address you set on the first port of the Synology (10.1.7.10 in my example)
Copy the IQN to the Target IQN area
Repeat 6-8 for the second IP (10.1.8.10)
You may wish to hit save here, and then reopen the host profile for editing. If a host profile is opened too long, the config changes are timed out (something VMware needs to fix)
Expand Networking configuration > Host virtual nic > Click on the +
Add the name of the Distributed Switch, Port Group, and scroll down
Add the VLAN, Network Policy, Active Uplinks, Standby Uplinks, and scroll down
Add the name of the VMkernel adapter (vmk9), MTU
Expand the new VMkernel port, click on the IP address section
Set the IP Address Settings (usually change the IPv6 stuff to "User must explicitly choose the policy option)"
Repeat Steps 11-16 for the other VLAN/Port Group
Save the Host Profile
Validate that the Host Profile saved successfully (shows Completed in the Recent Tasks)


Update Host Profile Customizations and Remediate
Log into the VCSA if you are not presently
Go to Inventory > Hosts
Select a VMHost in the cluster (top down is how I do this)
Click on Configure > Host Profile > Edit Host Customizations
Find the new VMKernel Network settings, Host IPv4 address and Subnet Masks
Fill in the new IPs/subnet for each VMKernel Adapter, then click OK
After the host customizations have completed being updated (saved to the VCSA DB), Click on Remediate
Click on Pre-Check Remediation (do this for your first host particularly, after this, you may just remediate)
Wait for the precheck to complete, then click on Remediate again
Uncheck the Auto Reboot check box and then click on Remediate
After remediation is completed, click on Configure > VMKernel Adapters, Validate the new VMkernel adapters now exist.
Click on Configure > Storage Adapters > vmhba64 (software adapter) > Static Discovery. Validate that the new iSCSI server and target are now listed.
Click on Storage Adapters > Devices. Validate that the Synology iSCSI Disk now shows up (if you did things in this order and all networking is working this should show up). If it does not show up, do a storage rescan and check again. If not further troubleshooting may be needed.


Create the Datastore
Now that the LUN is showing up in the iSCSI Devices area, you can create the Datastore
Login to the VCSA (if you presently are not)
Select 1 host in the cluster
Click on Actions > Storage > New Datastore
Select VMFS and click on Next
Type in the Datastore name, Select the Synology LUN, and click Next
Select the newest version of VMFS (VMFS6 presently), and click Next
Leave the Partition Configuration standardized, and click Next
Validate your settings, and click Finish
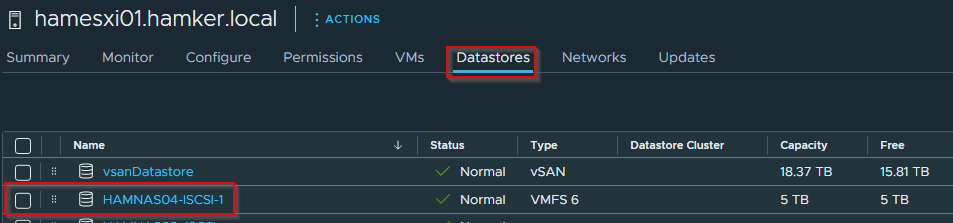
Click on Datastores for that Host. Validate that the new Datastore is now present
Select the VMHost Cluster
Right Click the Cluster > Storage > Rescan Storage
Leave the defaults for the Rescan Storage and click OK
Click on a VMHost > Configure > Storage Adapters > vmhba64 > Paths
Validate that you have 2 paths to the Synology Datastore and that both are Active (I/O). If both are not active, you may need to run a script to setup the proper pathing policy.


Create Synology VMHost List
Now that all the VMHosts see the datastore, you will want to document in the Synology what each VMHost is (this will later be used to secure the LUN so that it is not accessed by anything else on the network).
Login the Synology
Go to SAN Manager > ISCSI
Click on Create Host
Click on Start
Type in the name of the VMHost and click Next
Select Read/Write Access (default) and click Next
Validate the configuration and click Done
Validate that the new VMHost shows on the Target Screen. There should be 2 listings for each host since there are 2 connections.


Set Synology iSCSI Access Permissions
Now that all of the VMHosts are registered, you will want to secure your iSCSI Target so that only these hosts can access it. This prevents other network users from accessing this iSCSI LUN.
Click on LUN > Edit
Click on Permissions
Change Permissions to Custom
Set all VMHosts to Read/Write
Click on Cache
Review if you want to turn on FUA and Sync Cache (probably a good idea) and click on Save


Comments